Showing posts with label Technique: 3D Project. Show all posts

Wednesday, April 16, 2014

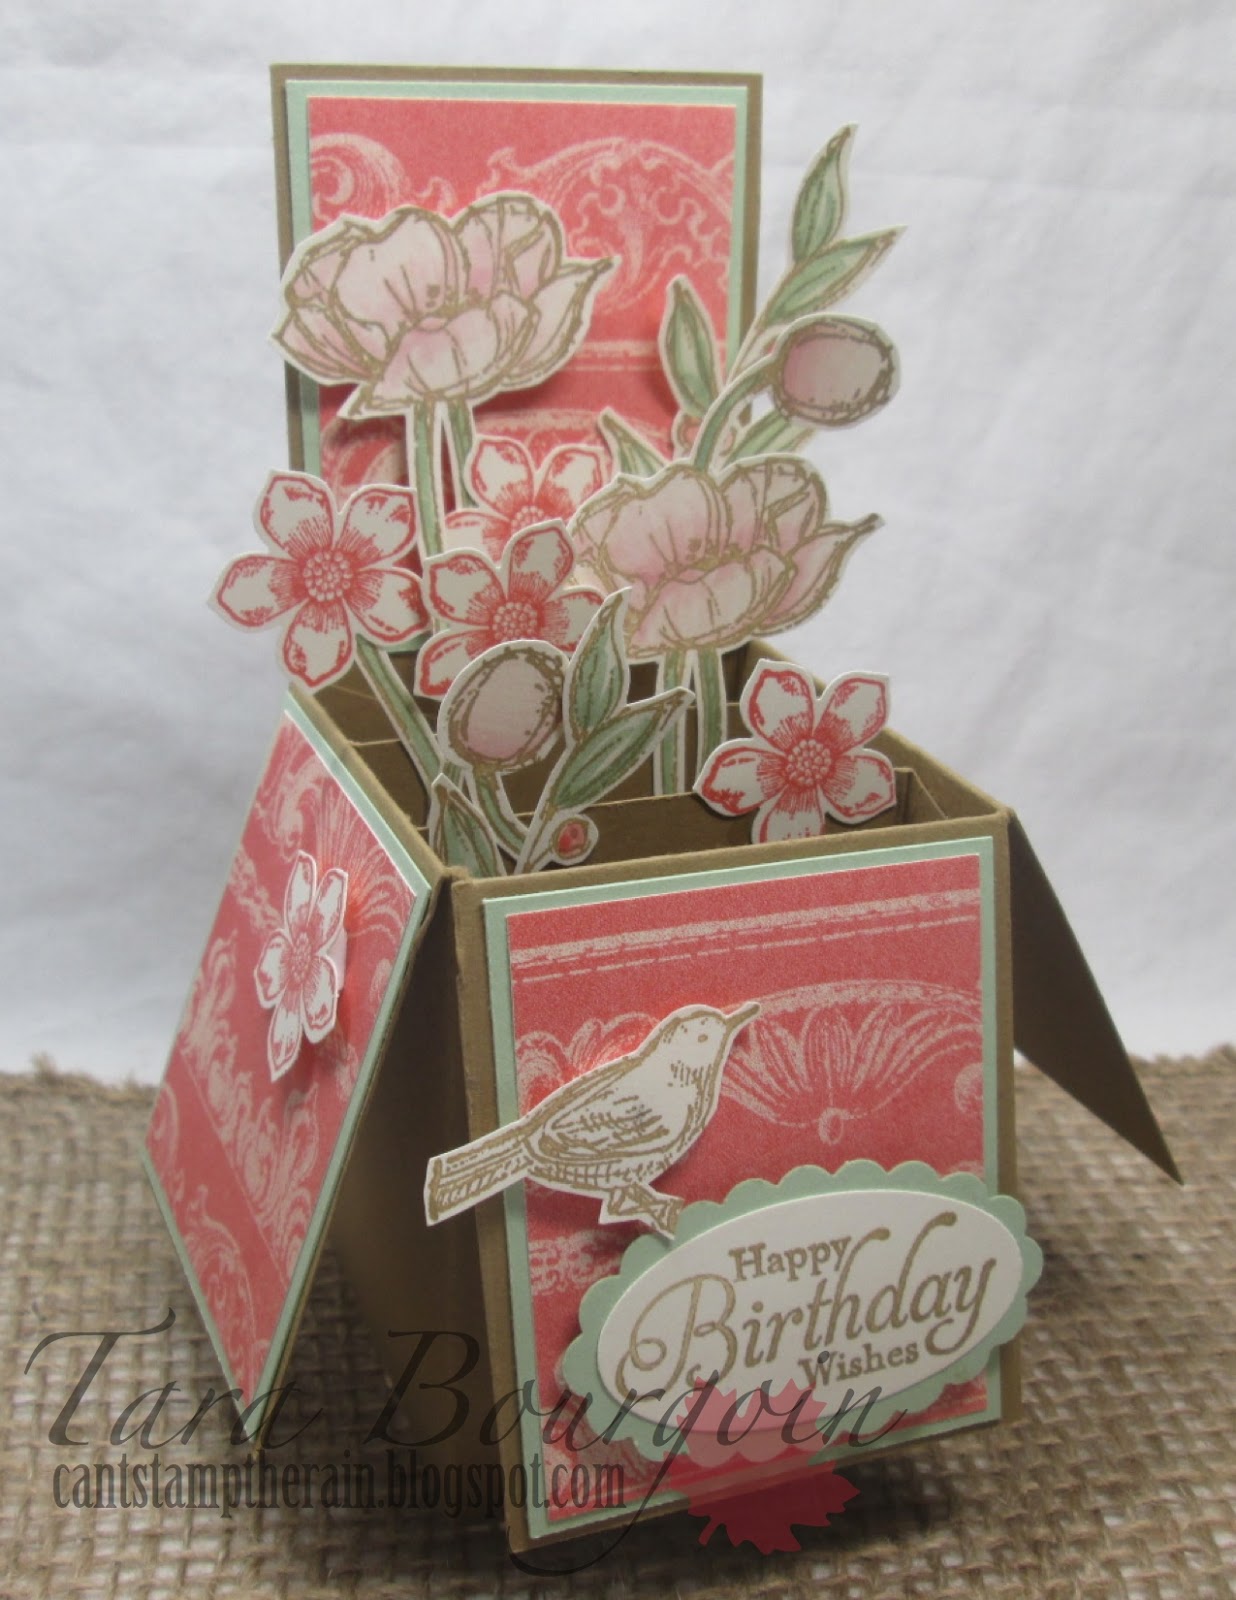
Card in a Box... finally!

I have been seeing these 'Card in a box' projects all over the place lately and have been just dying to try one out.  This one was made for a very special friend and I wanted it to be very romantic and have a very vintage/Victorian feel.


To make the box, I followed the tutorial over at Split Coast Stampers (and used the altered dimensions so that it would fit in a standard card).

The base is Baked Brown Sugar and I have (finally!) used more of the Etcetera DSP! I just love this paper and spent a long time decided exactly which piece to use for this project :)

I've layered the DSP pieces with Pistachio Pudding CS and popped each panel onto the flaps. Most of the elements (the flowers) are from the Simply Sketched set, with the exception of the little flower from Petite Petals. I coloured the flowers in with Blushing Bride, and then stamped the smaller flowers in Calypso Coral. I love, love, love the Simply Sketched set, and have used it more times than I can remember!

What is your favourite set? The one you go to when no other set will do? 

Check out the challenge this week at Colour Me...!

Thanks for stopping by today!

-Tara
xox


Supplies:
Stamps: Simply Sketched, Petite Petals
Inks: Baked Brown Sugar, Calypso Coral, Blushing Bride, Pistachio Pudding
Paper: Etcetera DSP, Baked Brown Sugar CS, Pistachio Pudding CS, Very Vanilla CS
Tools: Petite Petals punch, Scalloped Oval punch, Large Oval punch

Wednesday, April 2, 2014

Monochromatic Easter for Colour Me...!

We have a fun monochromatic colour combo for you today at Colour Me...! 

Easter is a great time to make cute little treats and special packaging. I like to try and do something new for the kiddos each year. This year, I went with one of these super sweet treat tubes and a doodled 3x3 note card.


The carrots were doodled onto a piece of Whisper White and the concept came about as I was on a call at work not too long ago. I was drawing tornadoes, and then realized that they looked a lot like carrots... I've been just waiting for the perfect opportunity to try them out :)

The top of the carrot treat tube is Burlap Ribbon that has been separated out strand by strand and tied together with a piece of Linen Thread. Another piece of Burlap Ribbon was adhered around the top. 

The treat tube itself was made with Pumpkin Pie Core'dinations paper and embossed with the Elegant Lines embossing folder for something a little more exciting.

Check out the challenge this week:


Thanks for stopping by today!

-Tara
xox

Supplies
Stamps: Teeny Tiny Wishes
Ink: Pumpkin Pie, Baked Brown Sugar
Paper: Pumpkin Pie Core'dinations, Whisper White CS, Crumb Cake CS, SIlver Glimmer Paper
Embellishments: Burlap Ribbon, Linen Thread
Tools: 1-3/4" Circle Punch, Small Oval, Itty Bitty Punch Pack, Cupcake Builder Punch

Tuesday, February 18, 2014

Mailbox happiness!

I finally sat down and made something I've been thinking about for a long time - a little mailbox of happiness for our family! We're suffering from Winter's-almost-over-but-Spring-is-still-too-far-away blues these days, and we needed to start celebrating the small things that make us smile.

With the new Sale-a-Bration stamp set, I couldn't resist! The "You make me happy when skies are gray" stamp from See Ya Later was just perfect!


My oldest son absolutely loved The Bee Movie and there's a part in the movie where Barry B. Benson says that bees can't fly in the rain - Hunter always used to get so upset for the bees... He was devastated that they couldn't go out in the rain. So for awhile, when it was sunny, he used to say "the bees can come out today!". I thought incorporating the bees into the mailbox was a fun idea. Worked perfectly for the Dynamic Duos challenge this week as well :)


Each family member has a different coloured envelope, and when the little 'you've got mail' flag is up (it's hinged on a brad), then you can check the box and see who the warm-fuzzy is for. 

It's a very basic design, starting with a 6" x 3-1/2" base and curving a 6" x 12" piece of cardstock overtop. The sides were reinforced on the inside using Coaster Board to help it stand straight and and not bow. The front of the mailbox was trimmed using the Oval Framelits die and the inside was lined with a piece of Daffodil Delight Polka Dot Parade DSP. 


The bees were made with the small oval punch. Their tail was done with the bottom of the small heart punch and the head was made with the small circle from the itty bitty punch pack. Their wings are punched from vellum with the small heart punch. 

The mailbox is fastened with an Antique Brad and a hair elastic. 


I hope to make a tutorial and have that posted within the coming weeks, so please check back! 

I played along with the Dynamic Duos challenge this week; Basic Black and Daffodil Delight with the added challenge of a shaped card. I didn't do a shaped card, but thought a 3D project would be cool too :)


Thanks for stopping by today! 

-Tara
xox

Supplies:
Stamps: See Ya Later
Inks: Basic Black, Daffodil Delight, Basic Gray, Coastal Cabana
Paper: Polka Dot Parade DSP, Basic Black CS, Daffodil Delight CS, Whisper White CS, Vellum, Coaster Board
Emellishments: Antique Brads, Candy Dots, Brad Base
Tools: Big Shot, Paper Piercing Pack (Essentials), Paper Piercing Tool, Oval Framelits, Oval Punch, Large Oval Punch, Small Heart Punch, Petite Pennants Punch

Sunday, January 12, 2014

Monograms for the Color Throwdown!

My (little) big boy is moving into a 'big boy' bed this weekend. He currently shares a room with his brother, so I wanted to make them each a little 'something' to have at the end of their beds. Not that there would ever be any confusion over whose bed is whose, but this is just more fun, isn't it? :)


I started with two wooden letters from Michaels. I coated them with Tombow and laid a piece of Watercolor Wonder DSP overtop. Once dried, I trimmed around the edges with a utility knife and then sanded around all edges with the Stampin' Up! sanding block to give it a blended look. The great thing about this block is that there is a big side and a smaller side, and the pieces of sandpaper can be removed - I did this to get into the crevices. Worked like a charm!


Next step was to do some 'faux stitching' around the edges with Crumb Cake Stampin' Write marker. I could have gone crazy, but I wanted to keep these simple for a couple of reasons; primarily to reduce temptation for them to pick stuff off! haha. 


The wooden pieces are some of the fun new embellishments in the 2014 Occasions catalogue, Essentials Wooden Elements. I LOVE these little pieces. The circle is covered in Calypso Coral washi tape from the This & That suite, the banner is covered with Pool Party cardstock and sanded down, and the sweet little heart is just left raw!

I drew their names on the banners and added two small Candy Dots, et voila! Super quick and easy, but the boys just love them. 

I used the colours from Color Throwdown this week, with some small substitutions since I didn't have Baja Breeze and Peach Parfait. I used: Pool Party, Crumb Cake, Island Indigo and Calypso Coral.

Supplies:
Paper: Watercolor Wonder Designer Series Paper, Pool Party cardstock
Ink: Crumb Cake Stampin' Write Marker, Island Indigo Stampin' Write Marker
Tools: Sanding System
Embellishments: This & That Washi Tape, Essentials Wooden Elements, Candy Dots

Thanks for stopping by today!

-Tara
xox


Friday, November 22, 2013

Kraft + Gingham at The Friday Mashup!

Good morning,

This week at The Friday Mashup, Erica has a great challenge for us that will be running for two weeks.

She's asking use to use Kraft and some gingham. I've never tried the gingham look with the Stripes embossing folder, so I thought I'd give it a shot on this little tag. You can check out a great video from Dawn O about the technique here.

The bag is filled with a little set of 6 cards with envelopes.


I love, love, love the Tag a Bag and Tag A Box sets! I have both of them, and use them any time I can for wrapping little gifts!

Check out the challenge this week:

  1. Create a project with "Gingham."
  2. Create a project using "Kraft or Crumb Cake. "
  3. Or Mash it Up and create a project "with Gingham & Kraft."


Be sure to pop on over at The Friday Mashup and se what all the design team has created - and don't forget, you've got two weeks to play along!

Thanks for stopping by!

-Tara
xox

Friday, November 15, 2013

Smile Gift Card Holder at The Friday Mashup!

Good morning!

This week at The Friday Mashup Lisa has us creating 3D projects with some fabulous fall and/or masculine colours; Baked Brown Sugar, Always Artichoke and Crushed Curry.

I always seem to forget how much I love Always Artichoke, so I love the friendly nudge in the right direction :)


I made a really cool gift card holder that I found on YouTube from Jackie Topa.

This was a super easy and quick little project - perfect for showcasing the envelope punch board and just in time for the holidays. I can see a lot of these little decorated pouches in my future.

Check out the challenge this week:

  1. Create a project with a  "Baked Brown Sugar, Always Artichoke & Crushed Curry."
  2. Create a "3-D project."
  3. Or Mash it Up and create a "3-D Project with the above Color Combo."


Please swing by The Friday Mashup and check out the projects from the Design Team and then link up your own project! Can't wait to see them all.

Thanks for stopping by today!

-Tara
xox

Friday, November 30, 2012

All wrapped up!

Hello!

It's time for a new challenge at The Friday Mashup, and Lisa is our host this week with a great challenge!

For my project, I decorated a Kraft Gift Box to give my neighbours some treats in. I used the fun, new Bold Snowflake single stamp and inked it in Pool Party. Before stamping it, I added some shimmer paint to the centre areas and faded it out towards the end. Then just stamp and punch it out with the Blossom Punch! How cool is that, right? Now you can use your 'summer' flower punch all through the winter too :)

I finished it off with some pearls, Pool Party Ruffled Ribbon and a bit of DSP from International Bazaar.

So lets get to the challenge!

  1. Make a project using "the inspiration photo".
  2. Or Make a "Gift project". 
  3. Or "Mash it Up" and create a "project for a gift using the inspiration photo above".

Thanks for stopping by today!

-Tara
xox

Sunday, April 1, 2012

Fly away!

I've been all about the 3D projects lately, but I think you'll agree, the Friday Mashup challenge left me little choice :)

It's the Fan Favourite this week at the Friday Mashup, and I've been super excited for it! The mashup was to:
  1. Make a project using "Colorful Twines".
  2. Or Make a "Kite themed" project.
  3. Or "Mash it Up" and create a "Kite themed project using some colorful Twine".
I made a kite for my son's door. The other son is getting one too, but I want him to be able to pick out the colours he wants, and this was made in the wee hours of the morning when I had some quiet time... so I started with the baby's. He has no say in the colours he gets ;)

Jackson Kite


Some details:
Colours: Bashful Blue, Marina Mist, Lucky Limeade, Calypso Coral
Ribbons/Twine: Bashful Blue grosgrain, Lucky Limeade and Calypso Coral Ruffled Ribbon, Lucky Limeade, Calypso Coral and White baker's twine.
Embossing on the bashful blue kite pieces is Perfect Polka Dots

The cloud 'paper' was made using the scallop circle punch out and marina mist sponging. The letters were cut out using the Big Shot and the naturally serif decorative strip. The bows on either sides of the name are made with the grosgrain and both coloured ribbons. The tail of the kite is made using all three baker's twines braided together for extra thickness. The other ribbons were tied on. The edge around the kite is made from the Fancy Flower punch that was cut up, and I usedthe two largest framelits from the wicked Labels Collection for the name plate

It measures approximately 12 inches wide (at the widest part) and about 14-15" long. 

I think that about covers it! 

-Tara

Saturday, March 31, 2012

Bright Wreath

My grandma was looking for something to hang on her door at the nursing home. She commented on how so many of the other residents have something 'pretty' on their doors, and hers looked so plain.

I've been wanting to try one of these rosette wreaths for so long, so I thought this would be a great opportunity to try it out and to brighten up her entrance.

Bright Wreath for Grandma <3


The fabulous spring colours come courtesy of the ColourQ challenge this week.

 
My husband is serenading me with an ad-lib song about our new green, shag carpet. It's incredibly entertaining... I didn't realize just how many things in our living room were actually green until he started listing them in verse! ;) And by the way, the carpet is actually really cool. It's not nearly as 70's as it might sound.

-Tara
xox

Edit to add: So excited that this card was selected as a "Colour Coutier" this week at the ColourQ. Thank you! :) 


Wednesday, March 21, 2012

The Lorax

I am going to preface this post by saying that I took a lot of creative license with the sketch from Freshly Made Sketches...So much so, in fact, that I wondered if I should really be entering it at all. But when it comes down to it, this card would never have come about without the sketch inspiration from FMS.

When I saw the fabulous circles on Lesley's sketch, it reminded me of Truffula trees. Probably because I love Dr. Suess and recently went to see The Lorax with our son. I wanted to create something a little fun and different, so here you have it. Believe it or not, it actually IS a card for his birthday (we are going to have a Dr. Seuss themed party this year), but I also wanted him to be able  to hang it on his wall when all was said and done, so I made the Lorax the "sentiment" instead. He does speak for the trees, afterall...

The Lorax Birthday

Here are some notes:
Truffula Trees - These are made from white satin ribbon coloured with Stampin' Write markers. I glued them on a circular base and overlapped a bit as I did that, then I cut the 'seem' off the side and pulled the fibres out to make them a little fluffy on the edges. I finished them off with a designer button to hide all the 'messiness'. They are Daffodil Delight, Real Red and Pumpkin Pie, though the red turned out looking a bit pink!

The Lorax - Made from a Large Oval Punch. The space to make his legs was using the same punch, and punching out only a bit with the short edge. His beard started out as a Large Oval as well. His head is a 3/4" circle punch.

The Bush - The bigger bush on the left was made using 3 petals of the fancy flower... I put it in again and angled (twisted) it slightly to  make the smaller bits. 

Everything was outlined with a Basic Black marker to make it look like a drawing. The circle around The Lorax was done with a white Gel Pen.

Here was the original sketch, and for good measure, a picture of the Lorax himself :)


Now that I have that out of my system, I'm ready to get back to reality :P haha

-Tara
xox

Edit to add: So excited - This card was chosen as a "Perfect Princess" with Freshly Made Sketches! Thank you, Tui :)


Monday, March 19, 2012

Fun in the Sun!

It has been remarkable here the last two days. The weather has been amazing (summer-like), and all the 'blues' of the winter seem to have lifted completely! It's so glorious :)

To celebrate, my entry into this week's RetroSketches is a little "Fun in the Sun" brag book. This is to keep all my favourite pictures from this upcoming spring/summer! I'm trying to make a point of actually printing some of the digital photos we take, so I wanted to make something fun to keep them in.

Fun in the Sun brag book


Here's the sketch. I kept the layout of the sketch the same, but I turned my project.

These little brag books are SO easy to make, and are awesome for gifts, or even just to keep in your purse to show off your favourite pictures (or even cards!). I have a few of them on hand :)

Yesterday we went and had some park fun. Jack took his first ride in the swing and loved it! Hunter, well... he's a seasoned pro ;)


-Tara
xox


Tuesday, February 21, 2012

Friday Mashup Fan Favourite Challenge

There's something really exciting going on at the Friday Mashup! They are currently having a "Fan Favourite" challenge, where we get to put forth a mashup that we would like to see as a challenge. I was very excited about this, but I must admit, it took my quite some time to come up with something! I have a new-found respect for what these ladies do each week!

My Mashup Challenge would be:
1. Create a "birthday card" project.
2. Create a "custom gift bag",
3. Or, "Mash it up!" and create a "birthday card with matching gift bag"!


The birthday card opens like one of those old-school file folders, where the string rolls around two little circles (in this case, brads). When it's undone, it folds down and the inside holds the birthday greeting. We made a version of this card at a meeting I had gone to, and I loved it so much I had to make it my own. (Edit to add: I was told that the original idea came from Becky Roberts)

I hope you like the idea for a mashup. If you want to make a birthday card and matching gift bag, you can vote for my challenge idea here on the side panel! I'm #8 :)

Until next time - Happy Stamping!

-Tara
xox


Labels

*Monthly Class* (1) *Project Life* (2) *Undefined Kit* (3) 2013-2014 Catty Sneak Peek Week (5) 2014 Occasions Sneak Peek Week (8) 2014-2015 Catty Sneak Peek Week (2) Artisan Award Finalists Blog Hop (10) Blog Candy (15) Catalogue: 2013-2014 (2) Catalogue: Holiday 2012-2013 (2) Catalogue: Holiday 2014 (2) Catalogue: Occasions 2014 (4) Catalogue: Occasions Mini 2012 (1) Catalogue: Spring 2013 (3) Challenge: Cas-ual Friday (2) Challenge: CASE Study (3) Challenge: Color Throwdown (3) Challenge: Colour Me (71) Challenge: ColourQ (12) Challenge: Create with Connie and Mary (1) Challenge: Creative Scrappers (3) Challenge: Dynamic Duos (36) Challenge: Fab Friday (3) Challenge: Freshly Made Sketches (37) Challenge: Friday Mashup (156) Challenge: Just Us Girls (1) Challenge: MDS Monday (70) Challenge: Merry Monday (4) Challenge: Mojo Monday (1) Challenge: Pals Paper Arts (7) Challenge: Play Date Cafe (10) Challenge: Retro Sketches (12) Challenge: Sunday Stamps (44) Challenge: Technique Time Tuesday (1) Challenge: The Paper Players (2) Challenge: Tiddly Ink (2) Challenge: Tis the Season (5) Charity (1) Colour Me (1) Craft Project Central (48) Die: Autumn Accents (4) Die: Mama Elephant (2) Die: Memory Box (2) Die: Simon Says (1) Die: Stampin' Up! (1) Die: Taylored Expressions (1) Die: Top Note (6) Die: Two Tags (1) Digital Scrapbooking Day (1) Edgelits: Adorning Accents (5) Embellishment: SimonSays (1) Embosslit: Fashionable Hearts (8) Embosslit: Little Pieces (1) Fabric: Flirtatious (2) Fabric: Summer Smooches (1) Framelits: Basic Set (1) Framelits: Bitty Banners (4) Framelits: Chalk Talk (7) Framelits: Curvy Keepsake Box (1) Framelits: Feathers (2) Framelits: Holiday (2) Framelits: Label (1) Framelits: Labels (16) Framelits: Landscape Trio (1) Framelits: Mustache (1) Framelits: On Film (1) Framelits: Ovals (10) Framelits: Stars (2) Framelits: Window (3) Framelits: Word Bubbles (1) Holiday Catalogue Sneak Peek Week (6) Kit: Boutique Boxes (1) Marker: Blendability (1) Marker: Copic (20) MDS (My Digital Studio) (107) MDS (My Digital Studio): Digital Tuesdays (3) MDS (My Digital Studio): TGIT (21) My Paper Pumpkin (2) Paper: American Crafts (1) Paper: Basic Grey (2) Paper: Bazzill (1) Paper: Bella Blvd (1) Paper: BoBunny (3) Paper: Crate Paper (1) Paper: Echo Park (1) Paper: Graphic 45 (1) Paper: Kaiser Crafts (1) Paper: My Minds Eye (1) Paper: Neenah (1) Paper: Penny Black (1) Paper: Stampin' Up! (10) Punch: 1 Circle (7) Punch: 1 Square (1) Punch: 1-1/4 Square (5) Punch: 1-3/4 Circle (8) Punch: 1-3/8 Circle (24) Punch: 1/2 Circle (18) Punch: 2 Circle (6) Punch: 2-1/2 Circle (10) Punch: 3/4 Circle (10) Punch: 3/8 circle (2) Punch: 7/8 Scallop (1) Punch: Banner (1) Punch: Bird Builder (1) Punch: Blossom (9) Punch: Boho Blossoms (7) Punch: Butterfly (5) Punch: Chevron (4) Punch: Corner (16) Punch: Cupcake (7) Punch: Curly Label (3) Punch: Decorative Label (22) Punch: Doily Triple Layer (2) Punch: Dotted Scallop Border (24) Punch: Elegant Butterfly (8) Punch: Fancy Flower (15) Punch: Hexagon (2) Punch: Itty Bitty (2) Punch: Itty Bitty Accents (1) Punch: Jewelry Tag (8) Punch: Large Oval (13) Punch: Mini Curly Label (1) Punch: Mosaic (2) Punch: Oval (1) Punch: Petite Pennants (2) Punch: Petite Petals (3) Punch: Postage Stamp (10) Punch: Scallop Circle (20) Punch: Scallop Oval (9) Punch: Scalloped Tag Topper (2) Punch: Small Heart (5) Punch: Small Oval (1) Punch: Spiral Border (1) Punch: Star (1) Punch: Ticket Corner (1) Punch: Ticket Duo (1) Punch: Word Window (3) SAB13 (3) SAB13: Feeling Sentimental (2) SAB13: Lemonade Stand (1) SAB13: Mini Curly Label (2) SAB13: Ribbon/Button pack (1) SAB13: Sycamore Street DSP (1) SAB13: Vintage Verses (1) SAB14 (2) scrapbook (2) Show & Tell (1) Sizzlet: Lots of Tags (1) Sizzlit: Floral Fusion (2) Sizzlit: Little Leaves (5) Sizzlit: Pinwheel (1) Spring Catalogue Sneak Peek Week (5) Stamp: Elements of Style (4) Stamp: 2CuteInk (2) Stamp: All in the family (1) Stamp: And Many More (3) Stamp: Apothecary art (4) Stamp: Aviary (4) Stamp: Baby We've Grown (2) Stamp: Best Dad Ever (3) Stamp: Best of Birthdays (1) Stamp: Best of Flowers (1) Stamp: Best of Love (5) Stamp: Blended Bloom (1) Stamp: Blooming with Kindness (9) Stamp: BoBunny (1) Stamp: Bold Snowflake (1) Stamp: Bootiful Occasions (5) Stamp: Boys will be Boys (1) Stamp: Bright Blossoms (3) Stamp: Bring on the Cake (9) Stamp: By The Tide (7) Stamp: CantStamptheRain (1) Stamp: Carry On (2) Stamp: Celebrate Baby (2) Stamp: Chalk Talk (3) Stamp: Chevron (4) Stamp: Christmas Bauble (1) Stamp: Clearly Besotted (1) Stamp: Clockworks (4) Stamp: Collage Curious (1) Stamp: Cool Kid (2) Stamp: Countryside (1) Stamp: Crazy Mixed-Up Love (4) Stamp: Cupcake Party (1) Stamp: Curly Cute (5) Stamp: Cycle Celebration (1) Stamp: Delicate Doilies (7) Stamp: Delightful Dozen (14) Stamp: Dictionary (2) Stamp: Draw the Line (1) Stamp: Elementary Elegance (2) Stamp: Elements of Style (7) Stamp: En Francais (5) Stamp: Fabulous Florets (1) Stamp: Fine Feathers (4) Stamp: Fine Flourish (1) Stamp: Flock together (2) Stamp: For the Birds (12) Stamp: Forever in Time (1) Stamp: Four Feathers (2) Stamp: Four Seasons (3) Stamp: French Foliage (2) Stamp: Fresh Vintage (4) Stamp: Friendly Phrases (5) Stamp: Funky Four (3) Stamp: Gnome Sweet Gnome (2) Stamp: Gnomenclature (1) Stamp: Googly Ghouls (2) Stamp: Gorgeous Grunge (7) Stamp: Greetings of the Season (1) Stamp: Happiest Birthday Wishes (1) Stamp: Happiness Shared (3) Stamp: Happy Day (5) Stamp: Happy Hour (2) Stamp: Happy Watercolor (3) Stamp: Happy You (1) Stamp: Hardwood (5) Stamp: Have a Seat (1) Stamp: Hello Love (1) Stamp: Holiday Home (1) Stamp: I Dig You (4) Stamp: Itty Bitty Banners (4) Stamp: Itty Bitty's (1) Stamp: Just Saying (2) Stamp: Kinda Eclectic (4) Stamp: Kindness Matters (4) Stamp: Language of Friendship (2) Stamp: Lawn Fawn (6) Stamp: Life Shared (1) Stamp: Lily Bee Designs (1) Stamp: Little Buddy Birthday (1) Stamp: Love and Sympathy (1) Stamp: Love You to the Moon (2) Stamp: Lovely as a Tree (4) Stamp: Magnificent Maple (2) Stamp: Make a Cake (1) Stamp: Make It Crafty (2) Stamp: Marianne Design (1) Stamp: Mixed Bunch (4) Stamp: More Merry Messages (5) Stamp: Moving Forward (3) Stamp: My Favorite Things (2) Stamp: Notable Alphabet (2) Stamp: Off the Grid (6) Stamp: Oh Hello (5) Stamp: Oh Whale (2) Stamp: Open Sleigh (2) Stamp: Outlined Occasions (3) Stamp: Owl Occasions (1) Stamp: Paper Pumpkin (1) Stamp: Paper Smooches (2) Stamp: Papillon Potpourri (4) Stamp: Peachy Keen (1) Stamp: Penny Black (3) Stamp: Perfect Blend (3) Stamp: Perfect Peacock (2) Stamp: Petite Pairs (19) Stamp: Petite Petals (2) Stamp: Pleasant Poppies (3) Stamp: Point & Click (1) Stamp: Point and Click (1) Stamp: Postage Collection (1) Stamp: Punch Pals (2) Stamp: Really Good Greetings (3) Stamp: Reasons to Smile (2) Stamp: Regarding Dahlias (4) Stamp: Santa Stache (2) Stamp: Santoro (1) Stamp: Scentsational Season (2) Stamp: Serene Silhouettes (4) Stamp: Short and Sweet (5) Stamp: Simon Says (2) Stamp: Simon Says Stamp (1) Stamp: simonsaysstamp (1) Stamp: Simply Sketched (5) Stamp: Simply Stars (5) Stamp: Snow Swirled (3) Stamp: Some Odd Girl (1) Stamp: Special Season (1) Stamp: Stampin' Up! (15) Stamp: Stippled Blossoms (6) Stamp: Storybook Friends (3) Stamp: Sunshine (2) Stamp: Swallowtail (1) Stamp: Sweet Cake (2) Stamp: Sweet Essentials (2) Stamp: Tap Tap Tap (2) Stamp: Teeny Tiny Wishes (29) Stamp: That's the Ticket (1) Stamp: The Newborn King (1) Stamp: Tiddly Inks (10) Stamp: Tim Holtz (1) Stamp: Timeless Talk (5) Stamp: Tiny Tags (6) Stamp: Today & Everyday (1) Stamp: Toxic Treats (1) Stamp: Triple Treat Flower (2) Stamp: Truly Grateful (1) Stamp: Two-by-Two (1) Stamp: Up Up and Away (6) Stamp: Watercolour Winter (1) Stamp: Wetlands (4) Stamp: White Christmas (1) Stamp: Wild Rose Studios (1) Stamp: Wildflower Meadows (2) Stamp: Winter Memories (4) Stamp: Winter Post (1) Stamp: Winter Wonderland (1) Stamp: Wintertime (1) Stamp: Wonderfall (1) Stamp: Word Play (6) Stamp: World Treasures (1) Stamp: Wplus9 (3) Stamp: You Rock (3) Stamp: You're My Hero (2) Stamp: You're My Type (1) Stamp: Your Next Stamp (4) Stamp: Zoo Babies (2) Stamp: Zoo Review (1) Technique: 2-1/2; Circle Punch (1) Technique: 3D Project (12) Technique: Blossom Punch (1) Technique: Box in a Bag (1) Technique: Brick (1) Technique: Brickwall (1) Technique: Bushes (1) Technique: CAS (3) Technique: Chevrons (1) Technique: Clear Block Stamping (2) Technique: Clouds (2) Technique: Colour Blocking (1) Technique: Coloured Embossing (1) Technique: Coloured Rhinestones (1) Technique: Coloured Ribbon (1) Technique: Decorative Label Punch (1) Technique: Delft Tile (1) Technique: DIY Embossing (1) Technique: Easel (3) Technique: Embedded Image (1) Technique: Emboss Resist (1) Technique: Fancy Flower punch (5) Technique: Faux Layer (1) Technique: Faux Stitching (11) Technique: Faux Suede (2) Technique: Flip Card (1) Technique: Heat Embossing (25) Technique: Herringbone (1) Technique: Ink Blowing (1) Technique: Iris Fold (2) Technique: Joy Fold Card (1) Technique: Masking (3) Technique: Outside the box (1) Technique: Paper Lantern (1) Technique: Paper Piecing (5) Technique: Paper Piercing (1) Technique: Pleats (1) Technique: Punch Art (6) Technique: Quilling (1) Technique: Quilted Card (2) Technique: Rock N Roll (1) Technique: Rolled Paper Flowers (2) Technique: Rosette (3) Technique: Scattered Embossing (1) Technique: Shaker Card (4) Technique: Side-Step Card (2) Technique: Splatter (1) Technique: Sponged Stamp (1) Technique: Spotlighting (1) Technique: Stained Glass (3) Technique: Starburst (4) Technique: Stitching (1) Technique: Triple Time Stampiing (1) Technique: Twisted Easel (1) Technique: Versamark Resist *Ghosting* (1) Technique: Vintage (3) Technique: Washi Tape (1) Technique: Watercolour (3) Technique: Watermark (1) Thinlits: Little Letters (1) Tool: Alphabet Press EF (2) Tool: Aqua Painter (1) Tool: Argyle EF (8) Tool: Arrows EF (1) Tool: Blendabilities (7) Tool: Blender Pen (5) Tool: Brayer (3) Tool: Chevron EF (9) Tool: Cloudy Day EF (6) Tool: Colour Spritzer (3) Tool: Darice (1) Tool: Decorative Dots EF (1) Tool: Distressing (1) Tool: Elegant Lines EF (5) Tool: Envelope Punch Board (2) Tool: Essentials Paper Piercing Pack (1) Tool: Finial Press EF (1) Tool: Framed Tulip EF (1) Tool: Gift Box Punch Board (1) Tool: Honeycomb EF (3) Tool: Lucky Stars EF (1) Tool: Modern Mosaic EF (2) Tool: Needlepoint Border EF (1) Tool: Northern Flurry EF (2) Tool: Occasions Paper Piercing Pack (2) Tool: Paper Piercer (3) Tool: Perfect Polka Dots EF (19) Tool: Perforating Rotary Blade (1) Tool: Polka Dot Mask (1) Tool: Sanding Block (3) Tool: Simply Scored (2) Tool: Stripes EF (6) Tool: Stripes Stencil (1) Tool: Stylish Stripes EF (2) Tool: Woodgrain EF (9) Tools: Aqua Painters (1) Wrap it: Tag a Bag (1)